"Hello World!" The long way around
Have you ever thought to yourself "Let's try to make this project as hard for myself as humanly possible"? No? Me neither, but somehow I decided that the best way to build a synthesiser was to build my own computer from the ground up. Follow me down a rabbit hole of yak shaving, as I attempt to reinvent the universe from the ground up. I think I may have really jumped the shark with this one.
Written 2024-04-04 7260 words.
I have since my early 20's had a insatiable fascination with old obscure computers, particularly machines from the in the transition between 8 and 16 bits. This was the time when computers were getting fast enough to be able to run complex software, yet were still dis-integrated enough that you could understand their operation from looking at the logic board.
The Truth Why Your Computer is Boring
At the dawn of the 16 bit era there were fewer constraints on what a computer is than today. Modern computers are effectively fungible. If you've used one IBM compatible workstation you've used them all. Modern variation in computing is discussed in terms of "how much" computer you have, not how that machine is fundamentally architected.
Naturally architectures do differ still today, but 40 years of unchallenged supremacy in the space of personal computing means that all modern computers are forced to provide a software interface that fits one of only two or three shapes, else be doomed to be irrelevant from lack of software support. Back in the 90's this rapid collapse in diversity of system architectures was referred to as the "WinTel Monopoly" however the x86 intel compatible computer has become so ubiquitous that the term has fallen out of use again.
The growth of arm has done little to disrupt this status quo. ARM has found success in the niche of providing portable devices with long battery life, and as quickly iterated it's self into another homogenous boring platform, that worse still is optimised for developing closed single use software platforms, and now has become one of those "acceptable" shapes a computer's software interface can take. (Look into Devicetree if you ever want to extinguish any hope for a mainstream open ARM device)
So today as a software engineer, bound by the system's software interface outside of the world of specialist applications in nano power, stupid high budget supercomputing, or some weird military thing, you're not likely today to see anything truly exciting in the world of computer architecture.
Which is why I find myself often thinking back to those late 8-bit, and early 16-bit systems. They were powerful enough to run the first versions of Windows, UNIX, X, 3D (ish) games, impressive business software, CAD, and more. But the hardware was still understandable to a passionate engineer. I know this because I am a passionate engineer and I can explain to you exactly how my Atari ST works. But the true magic in these systems what that because of their low level of integration if you didn't like how it worked you could actually change it.
Old machines often had mods available that could add new hardware, change the memory layout, or in some extreme cases change the CPU (and ISA) altogether. The software was supposedly quite simple too. Without the baggage of the expectation to run a vast back catalog of software changes to a computer could be made freely, as long as the engineer was willing to write new software to take advantage of their hardware.
Of course this situation was ultimately unsustainable. From the earliest days of computers, outside of strictly research settings, software has been write once read many. It doesn't matter if your software is commercial or open source, the goal is typically to get it running on as many computers as possible to solve a problem for as many people as possible. This meant that even in commercially released products features outside of the core system architecture were readily underused. Examples contemporary to the time include the Acorn Electron's addon hardware receiving little use by software developers, despite being available to purchase at a low price, and even being given away with new machines late in the machine's life. The Atari STe's blitter chip was rarely used by games, as this would break compatibility with the original ST which had the blitter hardware, but it was disabled due to a silicon bug.
Examples from my childhood in the 2000's were underwhelming games for the Play Station 3, due to game engines not being written to take full advantage of it's heterogeneous CPU, and very few games ever adding support for multi GPU compute, or GPGPU accelerated physics, because these features required specialist knowledge to develop and would not be useable by the majority of players. Today finally, we struggle with Linux distributions that do not ship binaries with ISA extensions such as AVX enabled, despite them having been available on the majority of CPU's sold for the last 10 years, due to that unending pressure to keep the software running on as many people's computers as possible.
For what it's worth I don't blame anyone for this. I think it's a natural side effect of computers spreading into the lives of every day people. Most users are not software developers, so it stands to reason that most software needs to run on many computers, and ultimately its the ubiquity of computer equipment and interoperability that made them able to change many people's lives for the better.
But as an engineer I will still yearn for the times when things were more... hackable.
How Hard Could it Really Be?
Is a dangerous question. As independent developers we're susceptible to underestimating the complexity of a project, by focusing on what we know, instead of considering the things we don't know if we know or not.
This was the question I found myself asking in November of 2022, while bored, and wrestling with the reality above, that modern computers are essentially all the same, and whatever you want to try is either impossible because one of the OS or the compiler says no, or somebody else has already done it. I was in a phase of my life where every tech project I worked on had to be somehow related to music technology, so the goal was simple, if vague: "Do something related to programmable sound generator (PSG) IC's" The problem was this project idea was boring, but at the same time impossible shake from my mind.
One option was to buy a PSG IC off the internet, (prey I don't get a fake one,) and wire it to an Arduino, add MIDI, and "boom!", something to blog about. This is probably what I would recommend someone else interested in getting involved with PSG's do. But it's too easy, and it's been done a hundred times with a dozen chips on a hundred different posts to Hackaday. No! I needed something harder, something "better".
The next logical step up would be to build a PSG inside an FPGA, add MIDI, and "boom!", a pro level project to blog about. But 2022 me as a snobby idiot about FPGAs and though a mixture of an general lack of tactility offered by a single chip solution and memory of dealing with horrible proprietary toolchains from university, I formed the emotional reaction "no, FPGA's are cheating!"
I briefly considered building my own PSG out of discrete logic IC's, but that was cost prohibited.
Then I stumbled into the realisation that what I was missing from the previous options was something I will call the "tracker effect" as I do not know a more correct name for it. Trackers were an integral part of the home brew electronic music scene between the early 90s at the introduction of the Amiga 500 into the early 2000's where the larger memory of Pentium II's allowed for fully featured digital audio workstations to enter the home. Trackers are unique in that they are platforms intended for creating and playing back an entire song, not just a single part or accompaniment, and must do so in the strictly memory limited environment provided by home computers of the day. Many of these computers had limited sound input and output hardware, designed to create nothing more than pitched beeps. Getting a diverse palette of sounds from a piece of hardware that can only beep requires some serious software trickery. The tricks used to manipulate a machine's sound hardware was often the differentiating feature between one tracker software and another, and in this community of remixing ideas were often quickly "borrowed" from one program to be incorporated into another.
All the various artistic tricks used, however relied on the principle that the computer and it's interface to the sound hardware is several orders of magnitude faster than the sound waves being produced. This allowed the software to update the registers in the sound chip while they were in the middle of generating a waveform. Sometimes this would happen multiple times in a single cycle of the audio waveform. One example was modulating volume to create a pseudo DAC from the tone generator, another was to rapidly change the pitch to give the illusion of multiple notes playing, but there were countless techniques.
I wanted to capture the experience of writing tracker "tricks" into my project, and such I realised that a simple MIDI interface, which has a meagre data rate of 25Kb/s wasn't going to satisfy me. I needed fast parallel access to my PSG. I could buy, build or emulate the PSG it's self, it didn't really matter. What mattered was the hardware interface to the chip, and the software to modulate it. Both needed to be fast. But naturally I couldn't just use a microcontroller. Few microcontrollers have parallel buses, and I reasoned bit banging an interface wouldn't be fast enough. Using an FPGA could be dismissed for the same reasons as before. No, what I needed was a fully fledged computer! But interfacing hardware to the PCI bus of a modern computer is problem out of reach for most hacker's time and budgets, so I was forced to think outside of the box. I thought back to the 16 bit Amiga and Atari I was trying to emulate... and, quite dangerously thought: "I could build that, how hard can it be?"
The Pillars of Computation
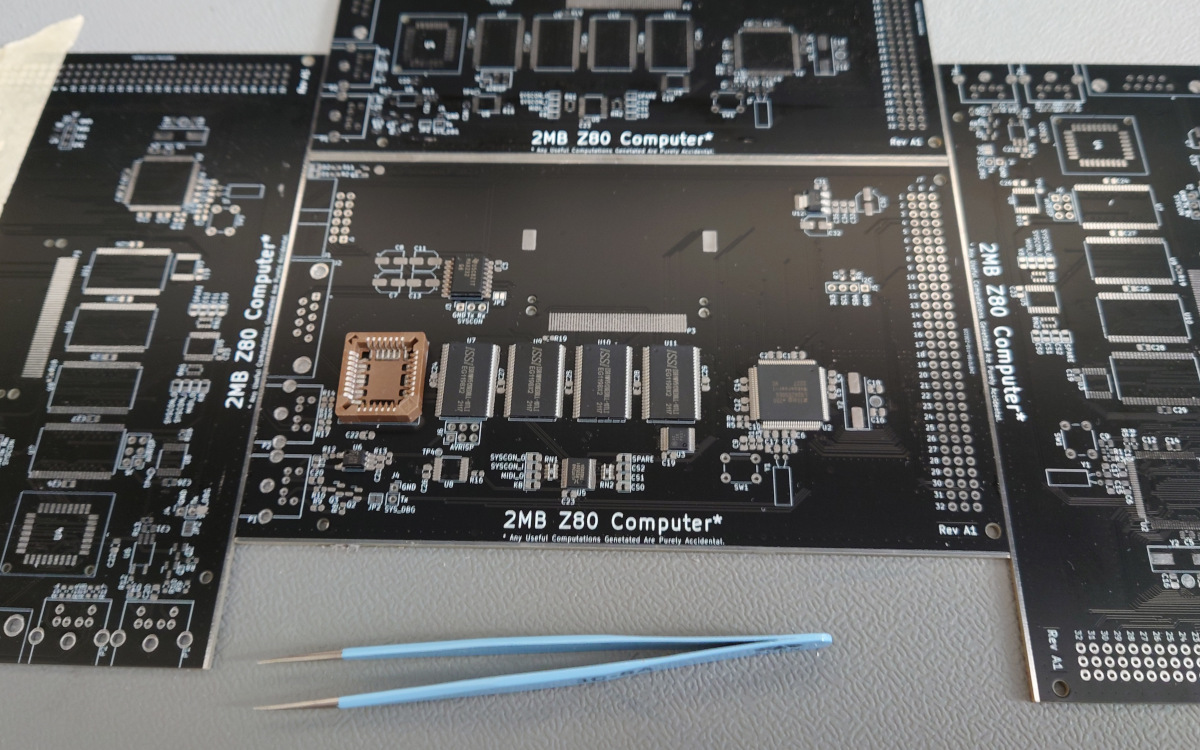
So though some unhealthy mental gymnastics the project goal was now to build a computer which had an exposed parallel bus that I could use to bolt on more expansion hardware later. I had a pretty strong idea of what I wanted the project to look like. I enjoy rackable equipment, there's something quite satisfying about putting semi-standardised blocks of equipment into a relatively compact frame; so naturally I settled on building a rack mounted extensible computer system. Eurocard while not too common these days felt like a good fit for the spirit of the project. Eurocard was popular in the early 80's in industrial computer systems, and used a backplane with standardised cards that slotted into a 3u sub rack chassis. The computer's were typically late era minicomputers in either 8 or 16 bit, so it was a good epoch fit too.
This system is heavy and expensive to get into, but I have access to piles of old scientific and industrial e-waste, so I figured I could build the few core cards I needed now and wait for a rack to fall into my lap.* So with the form factor settled I needed to start defining what my computer should be built from.
*Editor's note, its been over a year and this still hasn't happened
In its abstract form a computer has three main parts. First an environment in which to execute instructions. Second a place from which to fetch instructions. Finally a place in which to store results and access them again later for further processing.
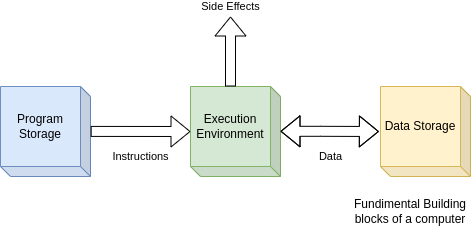
In a microcomputer these three functions map pretty cleanly to three chips. Naturally your CPU is the execution environment. RAM logically is where data is fetched and saved while it is in use. But in a modern PC programs are also stored in RAM. So what's the third chip? It's actually the BIOS ROM. With RAM forgetting everything on being powered down, the CPU needs some bootstrap code to set up hardware, load a bootloader from the hard disk etc. In the 8 bit days the entire operating system of the computer, and often the entire BASIC programming language was stored on a ROM chip on the logic board. In fact even the first IBM PC shipped with ROM basic as an option.
This is something disk operating systems like DOS and CP/M killed off in the 80's as floppy drives became more affordable, and the flexibility offered by interchangeable and upgradable operating systems became apparent. Imagine installing Linux on your laptop today, if it required you to unsolder your BIOS ROM chip.
Selecting a CPU
So with three parts to pick I started exploring what was popular among the systems I was trying to emulate. The logical place to start was the CPU; there was one standout candidate. The Motorola MC68000 line (M68K). This was used in all of the multimedia powerhouses of the late 80's including the Atari ST series, every Amiga, and the first few generations of Mac. The was only one problem, it's not been manufactured for 30 years. Nor does it have any clones, or really any successors. The M68K was the last hurrah for truly CISC architectures and was released shortly before the wave of Intel and ARM CPU's made everything RISC.
Loosely speaking IBM's POWER architecture is a successor to the DNA of the M68K, but today the only POWER chips available are surprisingly modern e603 SoC's which have modern features like DDR2 controllers, and onboard PCIe. Definitely a cool chip to explore, but not what I was looking for for this project. I also didn't want to use an x86 or intel 8080, or some ARM chip. I was trying to break free of the mold of the standardised computer, besides I get plenty of time working with ARM in the embedded space in my day job, so frustrated I found myself just scrolling through the "microprocessor" section of Mouser, looking for anything suitable to inspire me.
An aside on why I won't build with out of production chips
If you scroll the retro flavoured posts on Hackaday you'll find lots of successful projects based around chips long out of production. M68K's, C64 SID chips, and old yamaha synth chips are favourites, so clearly its possible to throw a hobbyist project together with one of these chips. Yet I have several reasons why I firmly refuse to use them in my designs. Prime among these is the fact that designing and building an electronics project, especially one with PCB's takes a huge amount of effort. I do not like the idea of spending this effort to design around a difficult and often expensive to acquire chip just to only be able build one of them. Most of my free time projects are open source. Part of the reason for this is I want to share my work so others can learn from or otherwise benefit from my experiences - I am not just building for myself.
I don't feel there is much to benefit from exploring an open source project that can only be built a handful of times by a small number of people before the available supply of chips is used up. Which leads into my second reason: sourcing out of production chips is risky and expensive. Heck sourcing in production chips can be a nightmare sometimes. Many hobbyists will use eBay as a supplier for parts, but the reality of eBay electronics is it's a gamble if you will receive what you paid for, or a remarked chip that best case won't work as advertised, or worst case will damage the rest of your project. There s evidence that since Corona even parts as simple and abundant as MOSFETs have been remarked before entering the supply chain. For me dealing with this while debugging a complex project isn't worth the time or headache cost, so I only buy from "reputable" suppliers. Yes the term "reputable is rather problematic and elitist, but in this context I mean any company trusted enough in the B2B space that they'd probably get sued if they screwed up and shipped fake parts.
Because these sellers are geared up to cater to businesses they don't carry those rare and hard to source obsolete parts. It's not worth their time, and even if they ever did have them in stock I am sure they would be snapped up immediately.
Scrolling through lists of endless arm Microprocessors and weird parts with high price tags and no data-sheets I realised that there are in fact no 16 bit microprocessors left in mainstream production. Or at least none I could find at the time. Despite the disheartening results one part series stood out to me: the Zilog eZ80. Amazingly Zilog is still around, and still making its original z80 CPUs, and most of the support chips. However these days the available parts are all SMD and rated for a blazing fast 10MHz. Apparently they are still popular in industrial embedded applications where needing to support old software is a priority.
The z80 is no stranger in the retro computer scene, as it was popular in many early 80's 8 bit systems. It was software compatible with the Intel 8080, essentially being a clone by the 8080's original creators. It was also relatively cheap at the time, so found it's way into ZX80, 80, and Spectrum home computers, as well as in the Sega Master system (and later the Mega Drive for backwards compatibly.) CP/M was initially written for the 8080, so many CP/M compatible computers were shipped with z80's. Later Microsoft's MSX computer standard, would depend on the z80 for its series of cheap software compatible desktop computers. While the MSX standard was not popular in the west many Japanese Desktop computers from the early 80's used this standard and have a z80 at their core.
This legacy is what made the eZ80 so compelling to me. It was a relatively unknown successor to one of the most successful 8bit microprocessors ever. The eZ80 was an evolution on the old design, still being 8 bit and instruction compatible with the z80. But it had a new operating mode the extended the address bus and registers to 24 bit pointers too were now 24 bit, giving a machine built with this chip a flat 16MiB address space. 24 bit seemed like a weird value to choose, until I compared it to the 68K and the Intel 286. Both of these are 16 bit processors, with 24 bit addressing. What use would an ancient 8 bit CPU have for so much RAM?
"Zilog’s eZ80190 microprocessor is a high-speed single-cycle instruction-fetch microprocessor with a clock speed of up to 50 MHz. It is the first of a new set of products based upon Zilog’s eZ80 ® CPU. #
The eZ80 CPU is one of the fastest 8-bit CPUs available today, executing code up to four times faster with zero wait-state memory than a standard Z80® operating at the same frequency. This increased processing efficiency can be used to improve available bandwidth or to decrease power consumption.
Considering both the high clock speed and instruction pipeline efficiency, the eZ80 CPU’s processing power rivals the performance of 16-bit microprocessors." - Zilog eZ80190 data sheet
Yes this oddball successor to one of the simplest and cheapest microprocessors of all time has a 4 stage pipeline and clocks up to 50MHz. Something seemed fishy, until I looked at the revision table for the data sheet. The eZ80 series was released in 2001, when home computers had already moved onto the Pentium 4. This eZ80 was indeed trying to fight of the 68K and the i286, but not in the home computer market, instead it was released as far as I can tell in response to declining sales for the z80 in the embedded space. The eZ80 was part of Zilog's attempt to capitalize on the young industrial IoT industry, and they released the eZ80190 microprocessor as a more traditional counterpart to 3 other SoC style microcontrollers with the same 24 bit CPU core, but also with embedded flash, on chip debugger, and one part with an integrated Ethernet MAC. This line up of parts was aimed squarely at replacing the ageing z80 in the next generation of networked industrial equipment.
I started to form a narrative in my head. What if CP/M had won out in the business world? What if "Big Blue" fumbled the PC? With the demand for z80 CPU's growing out of control and demand from customers for faster business computers, maybe Zilog would have had the demand it needed to build the eZ80 15 years earlier. The's nothing revolutionary inside it, it wasn't even on a leading node in 2000. It certainly could have been possible...
It was settled, I had to use this chip.
Little did I know I just doomed the project.
Selecting RAM
With the CPU selected to be 50MHz and with a 16MiB address space to play around in, I decided pretty quickly that I wanted RAM that could take full advantage of the CPU. I knew I wasn't ready to deal with the complexity of working with DRAM. Especially when mating it to a chip that had no features for controlling it. The tight pipeline on the CPU also posed a constraint, I would need to be ready to transfer data every single clock cycle else I would kill the performance of the chip, despite it's speed and pipeline it doesn't have any sort of instruction cache.
I originally elected to use 4MB of 20ns SRAM but quickly lowered that to 2MB when I saw the cost of large SRAMs. Interestingly 20ns is still considered fast by modern standards. RAM latencies haven't really gone up since the 90's. If you decode the cryptic numbers on a DDR5 DIMM back to nano seconds, you'll get back between 50 and 70ns which was typical back in the 386 days. Practically speaking memory has only gotten faster though the use of caching and burst transfers. Keep that in mind the next time you think your program doesn't need to worry about cache locality.
2MB was in reality way larger than I needed, but I wanted multiple ram chips hanging off my memory bus, to get the true parallel bus routing experience, and 512MB is where the prices start getting reasonable. In hindsight this was a little silly, given that the reference designs don't show the eZ80 with banks of SRAM hanging from it, it probably wasn't designed to drive huge memory busses, after all it's a iIOT CPU.
Selecting ROM
To be honest ROM is boring. It comes in a variety of flavours, from ancient mask ROM, where the program is baked into the silicon, to modern byte addressable NAND flashes. They all have several things in common. They're cheaper than RAM, slower than your CPU, and they don't forget what you put in them when you power off.
EEPROM is still the standard for hobbyist projects, as its relatively cheap available in all sorts of sizes and packages, and is pretty easy to work with provided you have a rom flasher, which you can either build from an Arduino or just buy a Minipro.
With gallons of address space spare, I picked a cheap Atmel PLCC 512K EEPROM, that I could socket, it would be easy to change, and have loads of room for whatever programs I came up with.
Deciding on Peripherals
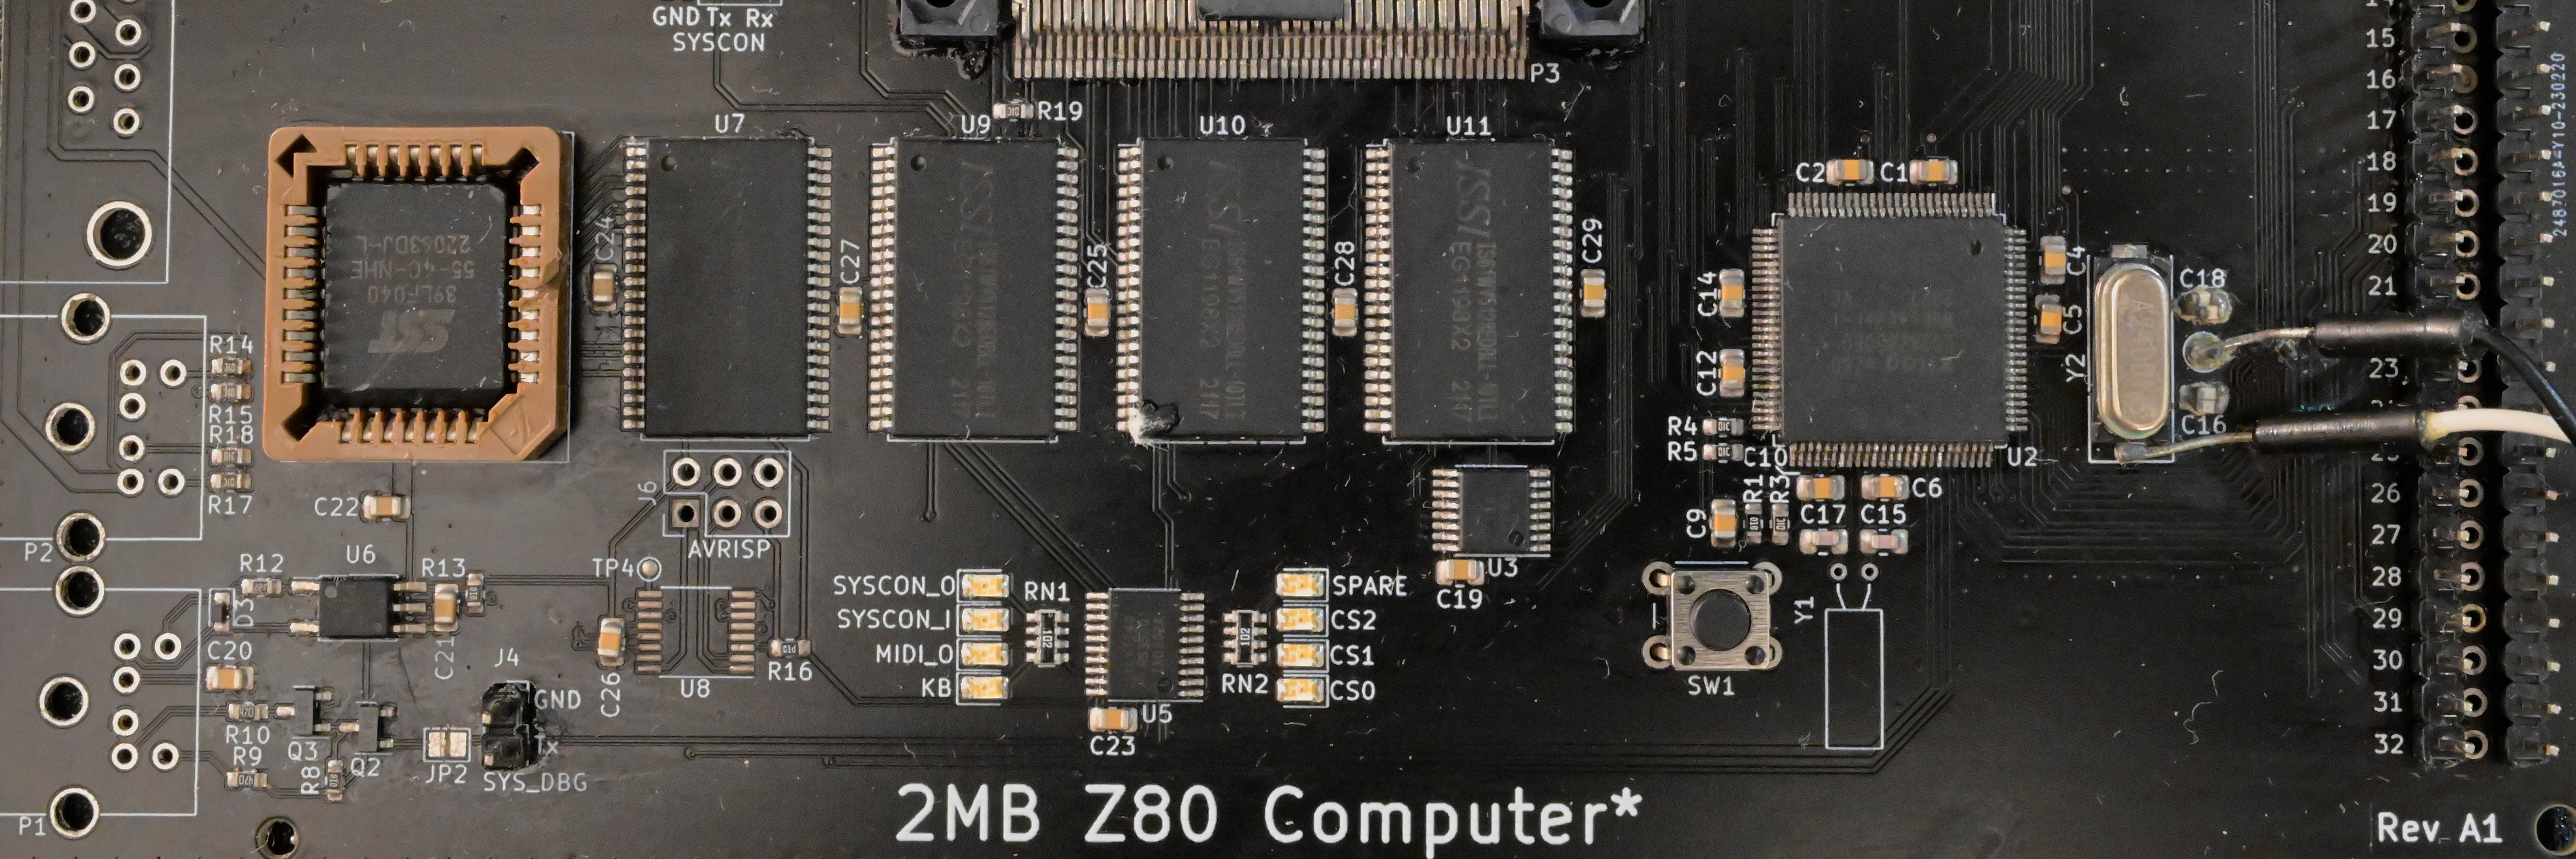
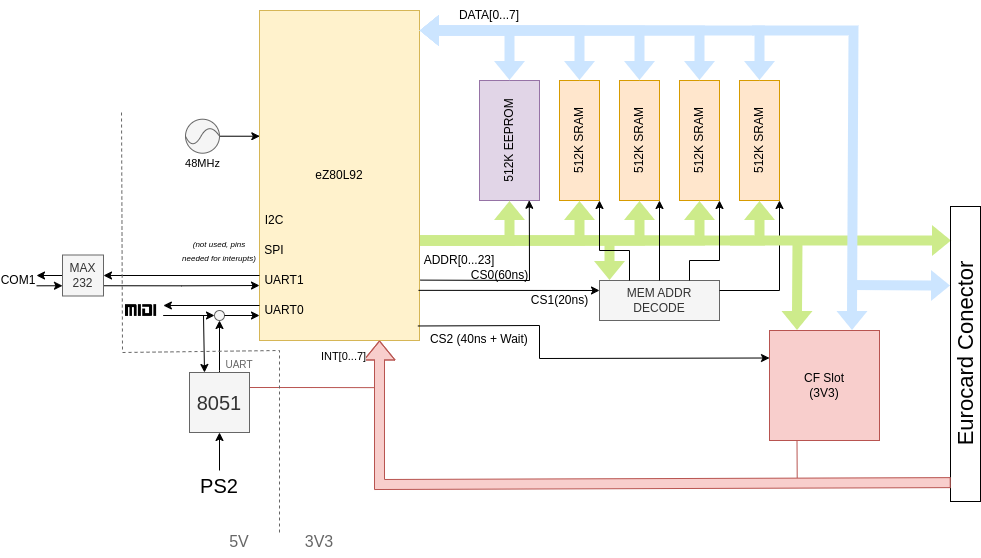
There was a lot of yak shaving around what to include on the board. I drafted countless ideas around different expansion cards I might like to make for this system. But I had little idea what I wanted to put on the main CPU PCB. There was a conflict between keeping any peripherals on the board simple enough so as to not risk failing to bring up the CPU, but also provide enough IO to make the CPU board useful on it's own, as the expansion boards and backplane were a long way off. The CPU helped with this by providing 2 UARTS, a SPI port, an I2C, and a few GPIO.
I knew for certain I wanted an RS232 serial port, as I had decided I did not at any point plan to have a video output on the system. "Video outputs are for games, this is a music computer." was my reasoning. MIDI was a logical contender for the other UART, one in one out. I Routed the GPIO bank that contained the SPI port to a PMOD connector on the board edge, figuring it may come in handy, and added a single GPIO controlled LED for debugging (I wish I had added about 4 of these). Finally for the CPU perihperals I routed the I2C to the card edge connector, again not really sure what to do with it.
I also added a compact flash connector to give the CPU card somewhere to load data from. I wired this directly to the system bus in flash memory mode, which would allow the CPU to directly access code and data from the flash on the card no differently than if it were in ROM. (As of time of writing this was never tested.)
Lastly I added a small 8051 MCU to read a PS2 keyboard, and multiplex onto the UART it with the MIDI input. This was vestigial to a earler design of this project using a larger PCB, with a large Character display, a Hexidecimal input pad and the keyboard connector for text input. That design was scrapped instead for the eurocard design when I realised it would have required a 25x30 PCB that would have cost a fortune to manufacture.
The block diagram of the final system looked like this:
Designing the Board
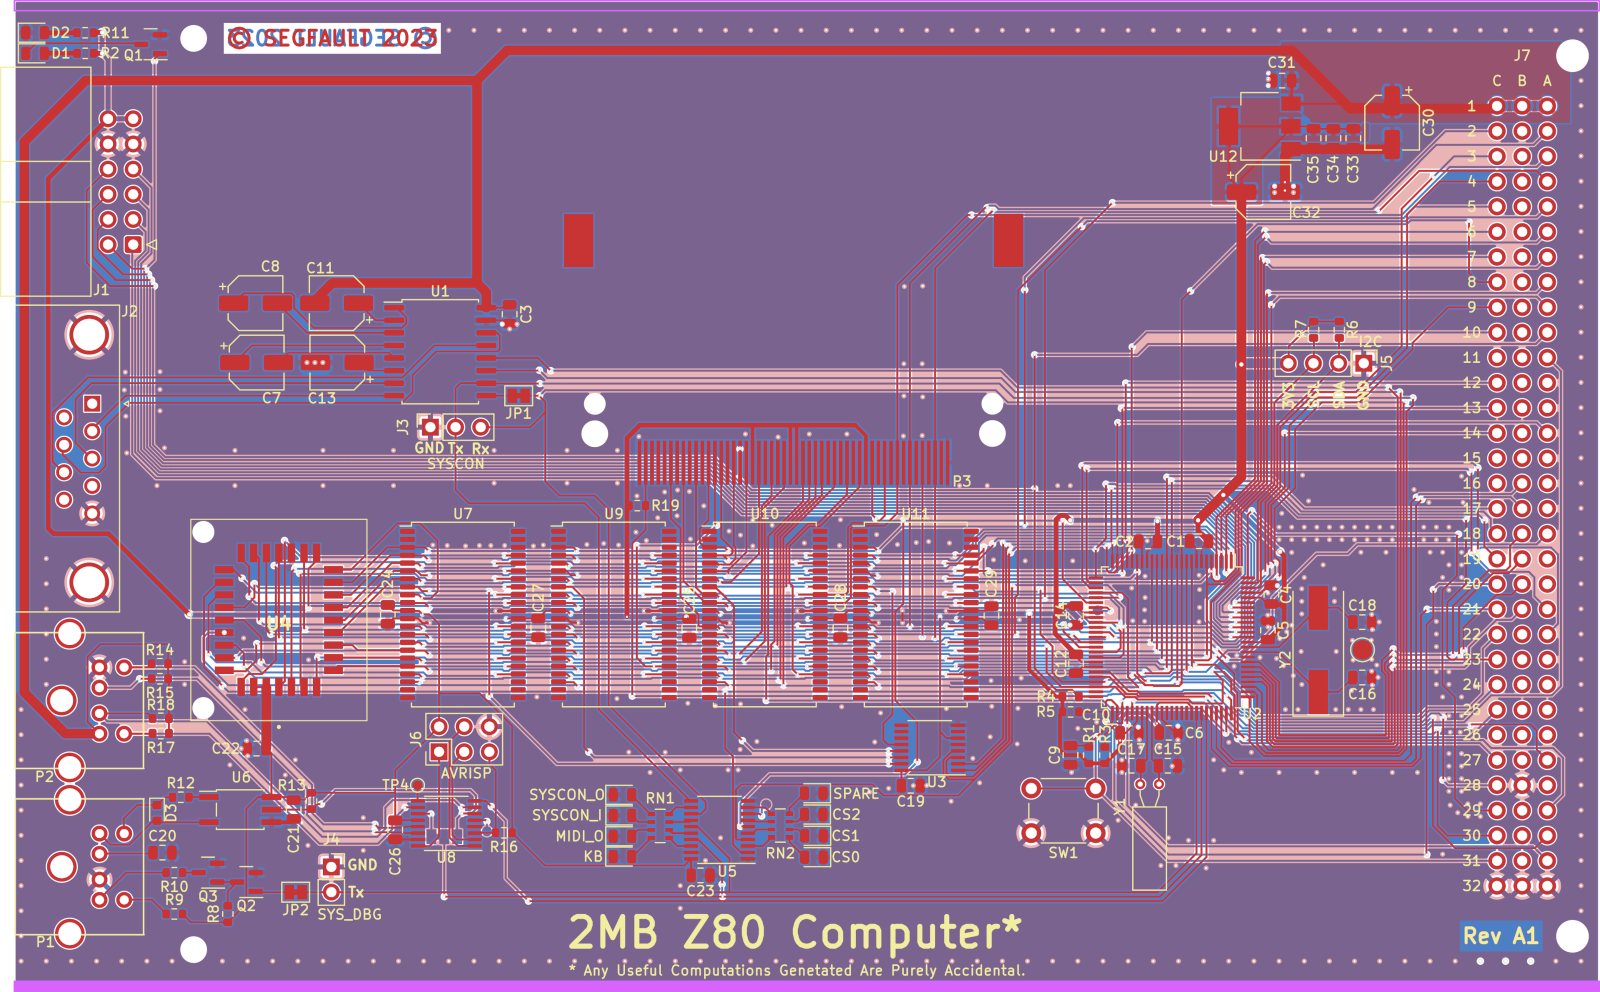
All things considered designing the board went pretty well. This was my first time routing a 4 layer board and my first time doing a high speed design. It ended up taking nearly 2 months and taught me the hard lesson why every modern communication protocol is serial. Even this mostly simple 8 bit bus had over 40 wires after adding in the address and control signals, most of which were needed at nearly every component. Routing this on two signal layers was a real challenge, and I had to throw away my routing job and start again twice. The solution to bringing the dense nest of wires from the CPU to the memory was a woven pattern, that if you ask me is very pretty.
I also learnt a couple of lessons about PCB design; at 50MHz I feared I would be in the domain of length matching and terminating my bus wires however it was explained to me that the board would need to be ~50cm long for reflections to be a major concern, something to keep in mind if I ever built the back plane, but not relevant for just the small CPU card. Signal speed in a PCB is measured at roughly 50ps/cm, depending on board materials, thickness etc, so with a clock period of 20ns length matching would only be relevant if I expected my traces to be more than 10cm different in length.
One thing I hadn't considered but but probably should have been worrying about was crosstalk. since the bus traces are quite long, weakly driven at times, and very close together there is a real possibility for data corruption. I should have made more effort to spread the traces out more. Ideally the traces should be double the distance from each other as they are from the reference plane (good luck with that on a two layer FR4) I found out about this constraint after I had already routed the board for the third time, shortly before I was going to order it. So I opted to cheat and selected my PCB vendor's thinnest impedance controlled dielectric available. This was expensive. Don't be like me, route your boards properly.
I use JLCPCB for all my PCBs from the last 5 or so years. They're cheap (if you don't order really high end impedance control) they can be a bit slow with shipping, and I have had some issues with blemishes on the solder mask (only a problem for front panels), overall I do recommend them. I am not sponsored, I just like their service.
Assembly Day
After ordering the boards, the parts, and some tools and supplies for reflow soldering I had spent over €400 on this project. The eZ80 CPU's alone where ~€25 each. Each individual circuit board was €12. There was ~€20 of memory on each board too. It all added up fast. I'd only bought enough parts to populate 2 boards, a main and a spare incase I blew anything up. Which meant I needed to get this right, first time, with high density parts. And as with every other step in this project, this was my first time reflow soldering a board from scratch. It was also my first time assembling anything remotely this large or complex. Not to mention that out of the box one of the parts I had ordered was wrong, the microcontroller to run the PS2 and MIDI was the wrong size, so this subsystem wouldn't be functional for a while.
Intimidated, I let the project sit on my shelf for weeks.
Eventually I marked out a weekend for "finally building the bloody thing", or at least that's how I remember describing it to my partner.
My partner was at the time a manual pick and place machine by day. Oddly enough for through hole parts that is a job that was automated in the '70s and since has been found that the machines needed for automation have so many moving parts that maintenance costs became unmanageable. The job has since been un-automated again. Board stuffer is a boring job, I am told, but at least you can listen to whatever you want in your ears while you work, and it still pays pretty decently for largely unskilled work.
So with her experienced eye looking over my shoulder I sat down dispensed what felt like a painfully large amount of solder paste over the stencil and started to squeegee it across the board. This too took three attempts, and a lot of solder paste and isopropanol, to get right. The problem I was having was getting a consistent and sufficient pressure against the stencil. This was leaving me with way too much paste at one end of the board and none at the other. On the third attempt I decided to work the board in smaller areas re-dispensing pasted for each area. This gave a more even covering, but still way too thick.
Placing SMD parts by hand is a pretty relaxing experience in my opinion. There is something satisfying about pulling the tiny parts out of their packaging one by one and placing them in the gooey paste, soon to be their final home, working together. I will say though, as someone who's nearly 30 and worn glasses their whole life, get yourself some really bright lights. The more light you have the smaller the thing you can see is. Seriously.
I had to reflow the board with a hot air rework station; it was all I had, but not ideal for such a large board. I took the process slowly, first preheating the board with the gun set to a low temperature around 70°C for a few minutes before cranking the heat up to reflow temps. This was a poor attempt at trying to mimic a reflow oven's profile, but I don't think it made much difference. Because of the large ground planes pumping enough heat to get the paste to melt was tricky, but once it was hot it gave a forgiving amount of time for poking the one or two parts that had shifted into the right place.
90% of the soldering went without issue. The two troublesome parts were the compact flash connector and the CPU, both of which had a slightly finer pin pitch that was eager to bridge under the heavy solder paste application. Clearing the compact flash card was mandatory even though I didn't plan to use it immediately as it was bridging pins on the main bus. (Yet another reason why modern microcontroller products favor point to point serial links) Cleaning up the CPU was a real challenge as the bridges found a way to hide under the pins. This caused problems again much later in the project, but with a soldering iron, some copper braid, and a lot of patience I believe I have now cleared all the bridges.
First Power On
Please remember that by this point I had spent 4 months of my life and over €400 on this small single board computer that now rested on the desk in front of me. It was late, the lights were dim. My partner had been asleep for a while, and I had spent the last several hours writing in raw assembly a boot code that would initialize the RAM then start blinking an LED. I was anxious as I plugged in power. I was ready for it to work, and I was ready for it to do nothing.
I was not ready for it to crackle and start smoking.
Chip shortage be damned, I had been forced to swap the 3.3V regulator on the board for a different model as the one I selected, a common part in the before times, was over a year on back order. In my naivety I had selected a new regulator, without first checking it's pinout, this one was backwards to the original, and I had just shoved 5V into it's output! The regulator was dead, but I now didn't know if it had failed graciously or if it had blown open and exposed the delicate CPU and RAM to 5V.
With my expectations lowering, I abused a nearby microcontroller dev board as a USB - 3.3v adapter, and rewired the board to be back fed 3.3v from it's I2C header. Trying again I applied power, this time nothing happened. Reluctantly I pulled out the scope and set about debugging. First looking for bus activity, nothing. Then the clock line, nothing, the chip seemed pretty dead. Lastly I checked the crystal oscillator, also nothing...
Which would explain everything else not working. Clock circuits can be tricky to get right, I rechecked the datasheet, and found the second schematic error of the night. I had built a clock circuit suitable for the 20MHz variant of the chip. The 50MMz version needed a more complex circuit with an inductor in to oscillate correctly.
Yet again the spare microcontroller came in handy, using a small rust program to bitbang a GPIO up and down was good for a MHz. I soldered as short as possible of a jumper wire to the crystal, and twisted it into a pair with a second wire soldered to ground, in the desperate hope to get a somewhat functional clock signal into the chip. The eZ80 board now looked like it was on life support from the significantly newer and more powerful STM32F446 that was both powering and clocking it. I applied power one more time, and... nothing. I had finally found the short under the crystal oscillator pin, that had been stopping the chip running this whole time.
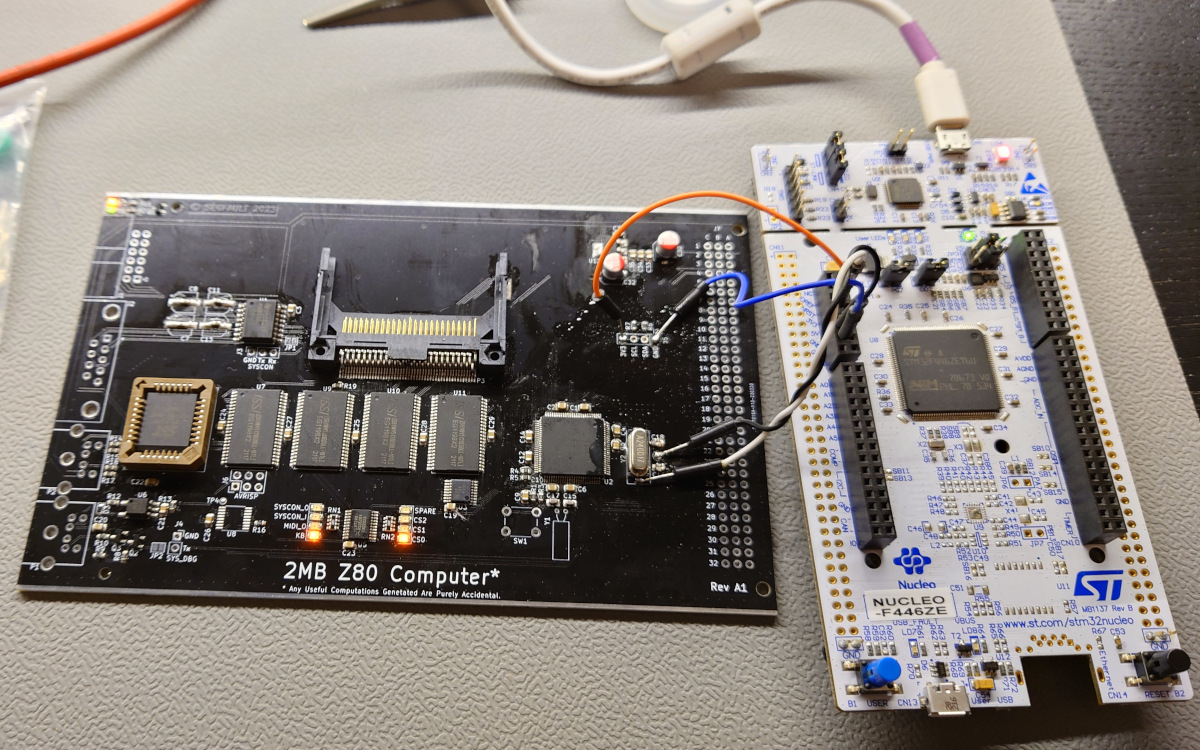
That was the final blocker. With the short removed, the clock line lit up with a clean square, the bus lines immediately came to life, and the board came out of reset... the LED even blinked. The clock crystal still couldn't run on it's own. I really did screw up the circuit for that, but the new microcontroller life support system had one superpower, I could now dynamically adjust the frequency of the chip. Which came in handy many times.
Larger STM32 parts have a peripheral called MCO (Master Clock Out) which is perfect for this task. When the MCO is routed to a GPIO that pin can be clocked directly from the main PLL, with it's own divider. So it is very easy to set up an exact output frequency, while leaving the STM32's CPU free to do something else. In this case it was free to execute halt. Using this setup and a memtest utility I wrote later, I was able to benchmark exactly how fast my board was able to go. I managed a respectable 42MHz before needing to insert wait states into the RAM. With a waitstate I was able to overclock the CPU to an impressive 72MHz before I chickened out and stopped pushing it.
Finally "Hello World"
After achieving the most stressful "blink.ino" equivalent I think I may ever experience in my life. The next step was to get the serial port working. However without the 5V rail the board was running in a degraded state. The main UART was wired to a RS232 line driver, that needed 5V to run and was now powered down. So that just left me with the UART that would have been run to the MIDI out, had it have been installed.
Configuring the UART ports is pretty trivial. About 3 registers need to be written, and a clock divider set based on the input clock frequency. Yet again it didn't matter how I configured the peripheral nothing happened. Until I found the last solder bridge. It seemed fitting that my crappy reflow job was the last hurdle. And with that cleared the board finally printed out:
Hello eZ80!
So now what?
Normally printing "Hello World" is the first step in the project.
I had at this point written a few programs in assembly for the board. I had successfully created my own computer, with some catches. But I wasn't excited, for the biggest problem was just coming over the horizon. I knew when I picked the eZ80 that is was a weird architecture. But there were some devices using it. For example it was popular in ti83plus calculators for a while. I have seem some [impressive things](youtube minecraft on the calculator) written for those.
So I expected some level of tooling to be available to write in C for my board. From there I expected to be able to bootstrap a filesystem and basic CP/M style OS, and make something functional with the board. But no. I for well over 2 months after finishing the board tried a variety of projects to get a working C cross compiler for my linux dev machine. The closest I got was two different patchesets for LLVM hacked together, in a build that I couldn't reproduces, and I wasn't really sure if the compiler was emitting the extended opcodes correctly. Some other options included NAME that flat wouldn't assemble it's output, so it had to be fed to a separate assembler and linker, which invariably wanted a slightly different syntax. Several options I tried claimed to support the CPU but in reality just emitted standard z80 asm, without the ability to leverage any of the extended addressing in the eZ80 at all. Linking asm files together with the the assemblers available was also hit and miss.
It seems that the TI calculator using this chip was a curse in disguise, because while there were many projects on the web claiming to support the chip they often only supported running code in TI's hacked together user mode on their os. Moreover most where either unfinished or of a hobbyist grade, as such not flexible enough to be convinced to write bare metal code for the eZ80.
By using an architecture without a well established toolchain, or retro software library to borrow from, I had put myself in the position where I needed to invent the every piece of software for the platform myself. This was a monumental undertaking even with a compiler. It was unimaginable in assembly.
It appeared I had only two options. Use the 20 year old proprietary IDE from Zilog that only ran on windows XP and came with a terrible GUI and no source control integration, or it was finally time for me to write my own C compiler, for a CISC architecture that few people understand.
Writing a Compiler for the eZ80
No... I wasn't going to do that. By this point this project had been running for nearly a year, and I had basically nothing to show for it. I don't have the knowhow to implement my own cross compiler, and I wasn't about to write an entire CP/M for the board in assembly using an assembler that can't even link properly. The yak had been shaved to the bone. It was time to stop.
What did we achieve?
At the end of this project we managed to achieve none of the goals set out initially. It's not a synth. Its a computer, and a barely functional one with no BIOS at that.
Instead we proved that, yes, you can in fact buy a CPU, RAM, and ROM, in 2022 and combine the core elements to build your very own computer platform. But we also proved that oh boy do you not wanna do that.
What did we learn?
- PCB design isn't as scary as you think it is. Watch some tutorials from experienced engineers.
- When electronic engineers start muttering about the challenges of "high speed design" they really mean stuff over 500MHz, you don't really need to worry about your microcontroller hobbyist project, until it doesn't work of course.
- SRAM is expensive!
- We are all spoilt by how good modern microcontrollers are at making any random crystal you hang off their oscillator work. Keep that in mind next time you're frustrated by having to configure a PLL.
- Yes you can overclock a z80.
- The massive software ecosystem the FOSS community has built over the last 30 years is an invaluable resource, use it! You'd be insane to try and build it all again from the ground up.

I like to end these blog posts on a positive. I'd put in some wish wash sentence about it being worthwhile for the experience gained or something. But not this time. This project burnt me out. I didn't want to look at another piece of hardware for over a year after killing this one off. The core idea of building my own system architecture has stuck around rent free in my imagination for much longer, and I have to remind myself every so often that to try again would entail yet again trying to build the universe from the ground up. Worse, for this I sidelined other more promising projects and the experience gained, z80 assembly programming and parallel bus routing, aren't exactly things that are going to be useful in the future in either a professional or personal context.
This project broke me. Don't build your own computer, no matter how alluring the idea is.
Seriously, don't - SEGFAULT